

I took my Fox F29 out for its maiden voyage today. Prior to heading out, I converted it from 80mm to 100mm of travel. I also spent some time dialing it in. The one concern I had was that the lockout wasn't working prior to my ride. For such an expensive fork, I was not happy.
The reason I switched. from my Reba Race (which I loved) to the Fox F29 was only because of a curiosity that I had. I wasn't able to imagine that anything would out perform my Reba and my only thought as to why others spoke so highly of the Fox F29 was due to its brand name. Now you are going to read something I've never told my wife... I WAS WRONG.
The Fox performed very well. While it was not an overwhelming difference over the Reba, the suspension, while still plush, felt much firmer. I'm not sure how to explain it and I've spent some time since my ride trying to figure out how to better explain it, but that's the best I could come up with. I suppose it simply feels less mushy or squishy. Also, after about a mile into the ride, as others had told me, my lockout began to work. Perhaps the oil needed to gather in the right places, who knows. The lockout was great. I think it outperformed the Reba lockout. I stood up on the pedals and mashed away and it felt like I had a rigid fork on the front.
All in all I'm very pleased with my purchase and I will be putting crazy miles on this fork. This is the fork I'm going to stick with, no doubt.
Here are my thoughts with respect to the Fox vs the Reba:
1. Suspension Feel: The Fox is superior in this area. Less mushy. A firm but plush ride. You will love it. The Reba ain't bad at all though.
2. Lockout: Fox wins again. I always had a bit of bounce in my Reba lockout. Due to its adjustability, the Fox felt like a rigid. It can have more bounce if I want it. Of course, the Fox does not have the poploc remote, which is a great convenience.
3. Weight: Reba wins. I believe the Reba comes in at 3.54lbs and the Fox F29 100 comes in at 3.78 lbs. Yes, the Reba is lighter, but if you give up a beer a week, you probably won't ever feel the difference. Just wait until after football season to give up that beer.
4. Features: Fox wins in the adjustability category, Reba wins in the convenience category. The pop loc remote is great.
5. Looks: I prefer the Fox due to the bad ass Fox stickers, but both look great in white.
6. Reliability: I have to say that the jury is still out, but it looks like the Reba wins. It seems like the Fox is just a little finicky and I can see problems springing up from time to time. What the heck is up with a lockout that only works after 1 mile of riding? I never had anything that went wrong with my Reba and it worked perfectly without fail.
Result: I think Fox wins on performance, but just like an expensive, high end sports car it is not without its drawbacks. The Reba is a very nice, reliable fork with some great features like the poploc remote and there isn't a great drop off in performance. Assuming equal price, I would say the forks are equal depending upon your priorities.
Monday, August 30, 2010
Tuesday, August 24, 2010
Convert Your Fox F29 Fork from 80mm to 100mm of travel
So I got my Fox 32 F29 RLC fork way ahead of schedule. It came in from CA in only a few days. That meant more time to play. While I still haven't finished its prep and full installation, I did complete the 80mm to 100mm conversion, as I promised I would do. I was very hesitant to start messing with the inners of a $500 fork, but it actually wasn't all that hard to do.


Voila!!! Mission complete.
You may also take this time to perform full maintenance or replace your oil since you have the fork apart anyway. I'm flirting with the idea of doing that since I did lose a tiny bit of oil. My plan is not to buy the Fox Float oil, but rather 85 wt gear oil, which is what it really is just a lot cheaper and 10 wt shock oil from the cheapest manufacturer. I'm also going to buy a syringe so I can accurately and neatly replace the oil.
Now that I have the fork set at 100mm, I am in the process of cutting the steerer, positioning the star nut and running the brake cable through the fork. I also want to get some kind of protectant for the fox decals as they look like they lift easily. I also need to dial the fork in per Fox instructions.
I hope the tutorial helped. Please leave feedback and let me know what you think. The steps were based on an article I found on mtbr, but I couldn't find any pictures detailing the best way to perform the surgery. I hope I've provided that here.
Keep in mind, I've messed around with a lot of bike parts, but the fork inners is something I never wanted to take on. It is my final frontier so to speak. I was a total novice getting into this and it took me about twenty minutes to complete with very little oil leakage or mess. Here are a few easy steps with pictures to complete your own conversion. I will try to be as clear as possible to ease your pain:

1. Back off the bottom black 10mm hex nut located on the air chamber side of the fork. It's easiest to use a hex socket for this, but mine wouldn't fit so I used a crescent wrench. It removed very easily. Just back it off a few threads. Do not remove it entirely at this time.

2. Unscrew the top blue cap that covers the air valve. Remove it and set it aside.

3. Using your air pump or some other tool remove all of the air out of the chamber. You may see a tiny bit of oily discharge in the air valve. That's normal.
4. After removing all of the air, use a 26 mm socket to remove the silver cap covering the air  chamber on the top of the fork, air side (of course). Totally remove it and set it aside. If you look down the air chamber, you will see the resevoir of thick, blue/green fox float oil.
 chamber on the top of the fork, air side (of course). Totally remove it and set it aside. If you look down the air chamber, you will see the resevoir of thick, blue/green fox float oil.
5. Grab a clean cup or other container (assuming the oil is clean and reuseable, otherwise you just want any container). Position the container over the air chamber and flip both upside down. The float oil will run into your cup. Make sure you save every little bit that you can so that you can replace as much as possible.

6. Now that your air chamber is clear, clamp your fork into a bike stand and make sure it is  almost horizontal. You will not want to make it completly horizontal, but let the lower legs reside just ever so slightly below the top of the fork. I went completely horizontal and ended up getting a slight leak of the oil from the lowers into the air chamber. Keeping it nearly horizontal will prohibit the lower oil (yellow oil) from leaking out during the next step.
 almost horizontal. You will not want to make it completly horizontal, but let the lower legs reside just ever so slightly below the top of the fork. I went completely horizontal and ended up getting a slight leak of the oil from the lowers into the air chamber. Keeping it nearly horizontal will prohibit the lower oil (yellow oil) from leaking out during the next step.
7. After the fork is clamped in, you will want to tap on the black hex nut on the bottom of the  fork to push the compression rod (where the spacer resides) out. Fox recommends using a plastic head hammer for this so you don't damage the fork. I began using a rubber mallet, but got nowhere. I then switched to a regular hammer and tapped very gently. You will also want to have a clean cup handy just in case oil does come rushing out. As you see in the pic, I set up a contraption with a cup and electrical tape so I wouldn't need 10 hands to complete the operation.
 fork to push the compression rod (where the spacer resides) out. Fox recommends using a plastic head hammer for this so you don't damage the fork. I began using a rubber mallet, but got nowhere. I then switched to a regular hammer and tapped very gently. You will also want to have a clean cup handy just in case oil does come rushing out. As you see in the pic, I set up a contraption with a cup and electrical tape so I wouldn't need 10 hands to complete the operation.
8. Once you see the bottom threaded piece of the rod push the through the hole in the bottom (if you've done step 6 correctly, no oil will come out), you will want to take a hex wrench or some other tool and push it through the hole to push the compression rod out the rest of the way.
9. Once the compression rod pops up through the air chamber, locate the spacer on top of the springs (it's that black, knob looking thing on top of the spring), and remove it by gently pushing it off of the rod. Once removed, the springs may stick in their original position for a moment. Just take a hand and help them extend fully to the top of the rod where the space was residing. You've just made your fork a 100mm travel fork. Congratulations!

10. Use your thumb or finger to push the rod back through the hole at the bottom. Assuming no oil was lost (it wasn't here) simply tighten your 10mm hex nut back on the threaded rod.
11. Tilt your fork back to vertical in the bike stand, and replace as much float oil as you can back into the air chamber.

12. Use your 26mm hex to tighten the air chamber cap.
13. Fill the air chamber with the required amount of air and replace the air valve cap.
Voila!!! Mission complete.
You may also take this time to perform full maintenance or replace your oil since you have the fork apart anyway. I'm flirting with the idea of doing that since I did lose a tiny bit of oil. My plan is not to buy the Fox Float oil, but rather 85 wt gear oil, which is what it really is just a lot cheaper and 10 wt shock oil from the cheapest manufacturer. I'm also going to buy a syringe so I can accurately and neatly replace the oil.
Now that I have the fork set at 100mm, I am in the process of cutting the steerer, positioning the star nut and running the brake cable through the fork. I also want to get some kind of protectant for the fox decals as they look like they lift easily. I also need to dial the fork in per Fox instructions.
I hope the tutorial helped. Please leave feedback and let me know what you think. The steps were based on an article I found on mtbr, but I couldn't find any pictures detailing the best way to perform the surgery. I hope I've provided that here.
Friday, August 20, 2010
Mission Accomplished!

After 2.5 months of searching, I finally found my new fork. On Ebay, I found a brand new, in packaging with box and all of the accessories 2009 Fox 32 F29 RLC fork. It is advertised as an 80mm, but I saw an extra spacer in the pictures which makes me believe it is actually a 100mm, which I prefer. If it is indeed an 80mm, then I will perform the quick operation to extend it to 100mm of travel.
The funny thing about the purchase is that I offered the seller, a week prior, a deal for the same cost as I bought it but away from Ebay to help him avoid the Ebay fees. He agreed but ultimately backed out of the deal. A week later, I  found it relisted on Ebay and I put in the only bid at the formerly agreed to price. That was ultimately what I paid for it, but he had to absorb the extra Ebay fees after all was said and done. I tried to help him out, but I guess he had to learn the hard way. I'll be sure to review it after I install it and ride.
Now I'm on the hunt for the last piece of the puzzle, an upgrade to the fly team ti 29er frame. That would be the ultimate finishing touch. I found a seller today who is selling the fully built bike. I'm waiting on his return email as to whether he'll accept my offer for the frameset alone. If he will, I'll go through one last build and put the ultimate bike together!
Friday, August 13, 2010
From 2 to none
So I made the decision to sell my Reba Race 29er, which I loved. I really wanted to give the Fox F29 a try. The bad news was that when I checked out the brand new Fox F29 that I bought, it turned out to be not so brand new. Granted, it was a take off, but it had marks, scuffing and nicks all over it. So I sent it back to the seller. For the last two weeks I've gone through life with no fork and, thus, no mountain biking. I've started my full time training for the Baltimore Half Marathon coming up in October, so I don't have a ton of time for it anyway, but I'd still like to be hitting the trail once or twice a week before the winter sneaks up on me.
Now I'm spending my spare time trying to find an affordable Fox f29. Ugh, I should've just kept the Reba and ridden the heck out of it. Let me be your cautionary tale.
Now I'm spending my spare time trying to find an affordable Fox f29. Ugh, I should've just kept the Reba and ridden the heck out of it. Let me be your cautionary tale.
Tuesday, July 13, 2010
Follow-up Review
The bike is doing well since its upgrading. It is very light, easily maneuverable, and rolls over big roots and even small to mid steps as advertised. One of the features I like best is the light weight front end. The upgrades, including the very light Reba fork, the super-light stem, spinergy wheels, and ti handlebar have made it very easy to pull up and over high steps and mid-size logs, even from a relative stand still.
I found myself in a position last week on a trail that I was riding for the first time, where I suddenly came upon a very large step that I did not see until the last minute because of a blind curve. I was already slowed by large roots leading up the step. Once I saw the step, knowing that I was at a near stall, I almost unclipped and changed my approach. Instead, though, I merely pulled up hard on the front end and really cranked down on the pedals and easily got up and over the step. My heart was beating pretty quickly, but it all turned out well.
I have no regrets with the Moto frame, tires or wheels or anything else for that matter. I recently, accidentally purchased a Fox F29 fork off of Ebay. I may switch it out with the Reba, although I hate to do it because the Reba has performed so well and it is lighter than the Fox. Still, though, many rave about the Fox so I really do want to try it. The version I purchased offers 80mm of travel, but I may choose to extend that to 100mm by doing it myself. Right now I have both forks advertised on Craigslist and we'll see which one sells first.
Other than that, just doing a lot of riding and trying to do new things and get better. I have a long, organized road ride coming up soon, so I may have to sit the mt. bike down for a couple weeks to train up for that.
Sunday, June 13, 2010
All Done...No, For Real I'm Done

The upgrading is done. Now it's time to just ride
I finished off my upgrades this weekend, tweaking the cable/housing setup, adding a much lighter FSA XC 115 stem (unbelievably light), a Cane Creek s-1 headset and a front Schwalbe Racing Ralph 2.4 tire (this thing is a true beast).

All in all, I'd say the project was a success. The bike is far lighter (dropped about 4 lbs), easy to maneuver, and it looks damn good as well IMO.
I also got a chance to use my new homemade  tools. My homemade headset cup remover was a success. I used a 1" diameter piece of copper pipe. I made three, three-inch cuts into the pipe and flared the pipe at the cut end. I then took a skewer nut cap and placed it tapered side down into the pipe at the end of the cut section. This reinforced the flared pieces of the pipe. I secured the nut with some electrical tape, which I also placed over the ends of the sharp, flared pieces of the pipe so as to cut down on potential damage to my headset. When it was time to pound out the cups, I took a v-brake pad complete with attached screw and placed the screw end inside the other side of the pipe and
  hit the brake pad with a hammer. The cups popped right out. The piece of pipe cost me about $3.
 tools. My homemade headset cup remover was a success. I used a 1" diameter piece of copper pipe. I made three, three-inch cuts into the pipe and flared the pipe at the cut end. I then took a skewer nut cap and placed it tapered side down into the pipe at the end of the cut section. This reinforced the flared pieces of the pipe. I secured the nut with some electrical tape, which I also placed over the ends of the sharp, flared pieces of the pipe so as to cut down on potential damage to my headset. When it was time to pound out the cups, I took a v-brake pad complete with attached screw and placed the screw end inside the other side of the pipe and
  hit the brake pad with a hammer. The cups popped right out. The piece of pipe cost me about $3.
I also used my new homemade bottom race installer. It is a 1 1/4 inch diameter piece of pvc pipe  about two feet long with a pvc end cap. I dropped the bottom race onto my fork steerer until it could not go any more. I then slid the pipe over the steerer, hit the capped end about six times solidly with my hammer, and voila, the bottom race was fully installed. Cost of the bottom race installer, about $2.50.
 about two feet long with a pvc end cap. I dropped the bottom race onto my fork steerer until it could not go any more. I then slid the pipe over the steerer, hit the capped end about six times solidly with my hammer, and voila, the bottom race was fully installed. Cost of the bottom race installer, about $2.50.
The last homemade piece of equipment did not fare so well though. I also made a homemade headset press. While it was up to  spec, I simply could not get the headset cups to sit straight upon pressing them in. I used a version with a 3/8 inch rod and a larger version with a 3/4 inch rod. I used plumbing female adapters, large washers, greased the cups etc etc. You name it, I tried it. After about 30 failed attempts, I ran it across the street to the lbs and five minutes later it was installed. I will come back to this piece this fall when I have more time and patience to make it work. Total cost $15 with all of the parts. The first version was made with about $10 of parts. Not bad at all!
 spec, I simply could not get the headset cups to sit straight upon pressing them in. I used a version with a 3/8 inch rod and a larger version with a 3/4 inch rod. I used plumbing female adapters, large washers, greased the cups etc etc. You name it, I tried it. After about 30 failed attempts, I ran it across the street to the lbs and five minutes later it was installed. I will come back to this piece this fall when I have more time and patience to make it work. Total cost $15 with all of the parts. The first version was made with about $10 of parts. Not bad at all!
Ok, I'm going to ride my new upgraded bike a lot this week. Peace!
Monday, June 7, 2010
Obstacles...

Mountain biking is about breaking through obstacles both literally and figuratively. Today, I did both. I headed out for a little adventure at Schaeffer Farms in Germantown, MD. The trails are far easier than the stuff up at Gambrill, but they still throw a lot of challenges out to a rider of my modest talent.
My biggest goal as mostly a beginner rider this year was to start conquering obstacles like log piles. I don't need to be climbing logs that are multiple feet in diameter or dropping off mountain rock faces, but I'd like to be able to work through a moderately difficult trail without dismounting time and time again.
I've been running through my head how to approach the log piles, unloading the front end, shifting my weight etc. But just as I approach the obstacle in real time, I decide to hit the breaks, opting for the more conservative approach of living to see another day, not getting hurt, and continuing my ride unscathed.
Well, today was the day that I planned to say "enough is enough." And sure enough, I somehow summoned up the courage, after a few attempts of lining up my line and actually gearing up mentally to do the stunts to try some log piles and larger obstacles in the trail. And don't you know I cleared right over and through them. With each obstacle cleared, I gained more and more confidence and was able to take the next obstacle with surprising ease.
It was a huge day in terms of conquering obstacles and making progress in developing my skill level! I can't wait to hit the trails again to keep adding to the stuff I can do. With each new challenge conquered, a whole new level of obstacles opens up before me, like new levels on a video game.
I love this sport!
Friday, June 4, 2010
Lay'n Rubber

So I just purchased the final two upgrades to finish off this project on my bike. First, I purchased a Schwalbe Racing Ralph 29 x 2.4 tire. This thing is large and in charge and light! Unlike many other 2.4's, this tire is truly a 2.4. The large volume casing allows it to run at extremely low pressures, increasing grip. The tire rolls fast and is super light weight at 540g's, about 100 grams less than my current MotoRaptor. I'll be keeping the MotoRaptor 2.1 on the bike as it is one of the best rear 29er tires out there.
I also purchased a FSA XC 115 stem. This thing is super light at 120g's, about 60 grams less than the Profile Boa stem I just bought. The boa is a little steeper than I thought and the light weight doesn't hurt either.
I'll be getting both parts on next week and hopefully I'll have time to install the new headset this weekend so I can weigh this rig and complete the project. It looks like a good week of riding is ahead for me next week at both Shaeffer Farms and Gambrill. I love summer!
I also purchased a FSA XC 115 stem. This thing is super light at
 120g's, about 60 grams less than the Profile Boa stem I just bought. The boa is a little steeper than I thought and the light weight doesn't hurt either.
I'll be getting both parts on next week and hopefully I'll have time to install the new headset this weekend so I can weigh this rig and complete the project. It looks like a good week of riding is ahead for me next week at both Shaeffer Farms and Gambrill. I love summer!
Tuesday, June 1, 2010
Complete!

The upgrading is mostly done now. I still want to put on my new Cane Creek S-1 headset to replace the crap that Moto put on the bike. I have the headset and my home made tools (I'll show these off in a later post) I just need to find some time to put it on. I'm also planning on a front tire upgrade. I'm just trying to find a nice, wide tire with low weight.
The bike is a lot lighter and easier to handle now. The performance is far better than it was with the stock parts. I added the Reba Race fork with push loc, egg beater 2 ti pedals, a titanium handlbar, xt cassette, spinergy xyclone wheels, ritchey wcs seat post, and I changed out my grips.
The bike is a lot lighter and easier to handle now. The performance is far better than it was with the stock parts. I added the Reba Race fork with push loc, egg beater 2 ti pedals, a titanium handlbar, xt cassette, spinergy xyclone wheels, ritchey wcs seat post, and I changed out my grips.
I have to re-weigh the bike. I'm guessing I shaved a few pounds off of the original 28 lbs. I love the look of the new version too, with the white fork against the gray frame and the mentions of red highlights throughout the parts of the bike. Here's some pics:

(Before)

(After)


Wednesday, May 26, 2010
I'm lovin' it
I'm in the middle of my project to lighten my bike, but with the new fork, the new ti handlebar, the seatpost and the new pedals on, I had to take it for a spin. The bike is noticeably lighter. I mean, very noticeably. I flew up the hills. The bike felt more nimble and was much easier to handle.
I'm a little disappointed with the Ritchey WCS seatpost. As many others have posted, it let the saddle roll out of position after hitting a decent bump (not a jump mind you). I'm going to chalk it up to a loose bolt since it didn't happen again after I tightened it up on the trial, but I've got my eye on it. Of course, the ever-reliable Reba Race fork did its job admirably. I liked the more narrow handlebar as well. I felt much more in control of the bike and actually was able to come out of a couple situations where I lost control after getting kicked sideways by a large rock.
I don't have pics yet because I'm waiting to finish the project first. The wheels, the new headset and the new xt cassette still need to be added. That should lead to another pound and a half of weight loss.
I do have to note that the egg beater 2 ti pedals are INCREDIBLE! I never knew a pedal could be this easy to get in and out of all while holding you in on jumps and hops. They are superlight and shed med like nothing. I bought a second set to sell for a profit, but I may just keep the extra set for my road bike. I am incredibly impressed. I ended up getting each pair for under $100 from Performance plus $20 of performance points from the purchase. You just can't beat that!
Stay tuned for pics.
Friday, May 21, 2010
Build II

Well, the shim for my handlebar isn't in yet, but I'm expecting it tomorrow. I picked up some pre-ordered goodies from Performance today. I picked up my XT cassette and my Egg Beater 2 ti pedals. They are superlight! I also got a killer deal on a Ritchey WCS seat post at under 200g, not bad for $33 after the use of some rewards points.

I put the seatpost on today already and I'm in the process of putting on the pedals. I'm going to try to get my fork on tonight, at least enough that I can measure and maybe cut it down so I just have to stick on the stem and handlebar tomorrow.
My wheels should be in next week and then it will be all finished. I swear, no more stuff...well, until I add the Moto Fly Team ti frame. Maybe next year :-).
As always, pics will be on the way.
Thursday, May 20, 2010
Resolution and Upgrades
Ok, so I resolved my headset issue. My buddy who used to be a bike mechanic confirmed that the broken headset piece is just a bearing seal and that it is not necessary and typically a pain to install. He noted that it's fine to ride without it and no damage will be done. Solved!
On another note, the upgrading is going well. I'm waiting on a shim for my handlebar to be delivered as it wasn't originally included with my handlebars when they were first sent. It should come in the next couple of days. I'm going to work on installing the fork this weekend and finish up the cockpit. I pick up my new eggbeater 2ti pedals tomorrow with my new XT cassette.

I also just purchased a new wheelset, the Spinergy Xyclone 29ers. Supposedly these are the beez neez of mtb 29er wheels. They offer super bling cred as well. I should have all of the upgrades done by next week for a trip to my buddy's house for memorial day. We're planning a ride, but we'll see if the wives allow that to actually go down.
On another note, the upgrading is going well. I'm waiting on a shim for my handlebar to be delivered as it wasn't originally included with my handlebars when they were first sent. It should come in the next couple of days. I'm going to work on installing the fork this weekend and finish up the cockpit. I pick up my new eggbeater 2ti pedals tomorrow with my new XT cassette.
I also just purchased a new wheelset, the Spinergy Xyclone 29ers. Supposedly these are the beez neez of mtb 29er wheels. They offer super bling cred as well. I should have all of the upgrades done by next week for a trip to my buddy's house for memorial day. We're planning a ride, but we'll see if the wives allow that to actually go down.
Wednesday, May 19, 2010
Motobecane's First Blemish...headset failure
So up until now I have had no problems with my bike (mind you it has only been two months, but still). However, upon entering my renovation project, I noticed a gap in my headset. Upon further inspection it looked as if a part, maybe a seal, wasn't sitting right in the assembly causing a gap and a slight wiggle in the headset. I disassembled the top cap and upper parts and noticed what appeares to be a cracked plastic seal. I tried reassembly but it is obvious that  this part creates and gap and does not really fit well with the rest of the assembly. After removing the piece entirely, the rest of the assembly fits very well and the
  headset/fork are nice and tight and the fork is free flowing. It almost causes me to wonder if the part is supposed to be there in the first place.
 this part creates and gap and does not really fit well with the rest of the assembly. After removing the piece entirely, the rest of the assembly fits very well and the
  headset/fork are nice and tight and the fork is free flowing. It almost causes me to wonder if the part is supposed to be there in the first place.
I first contacted Cane Creek about the issue, as it is a Cane Creek headset. At first the representative couldn't even identify the part or help me with its assembly or warranty. He then disclosed that Cane Creek doesn't even make this Cane Creek headset for this bike and that I have to contact Motobecane regarding the part, which I did.
I have a message into Moto presently and still have not received a response. I was surprised though by the fact that the CC rep told me that they didn't make the CC headset. I guess Buyer Beware on that point when buying a Moto bike from Bikes Direct.
Tuesday, May 18, 2010
Progress
Since I last wrote, all of the parts have come in for my little project to lighten my bike. I actually even bought a second handlebar after finding a great deal at Performance Bike on an Easton Monkey Lite XC carbon bar. But I think I'm going to either return it or sell it in favor of the carbon bar, as titanium is a little more sturdy.
So now I have the RS Reba Race fork, a new, lighter PD stem, a titanium handlebar, and a new XT 11-32 cassette. I'm also eyeing up a new wheelset, a Synergy Xyclone 29er set with white spokes that is keeping me up at nights thinking about. That would shave about another 400g's off the weight.
The bike weighed in last night at about 28lbs. We'll see how low we can get that without going too crazy. There are certain benefits to weight on a bike. Stay tuned!
Friday, May 14, 2010
Update on the decals and renovations
I finished the first of the decals last night. I think they look pretty good. I'm going to try to finish up that project this weekend and then I will be sure to post pictures on the site. I think they are really going to add something to the look of the bike.
I'm also starting to get the parts in for the lightening up project. I got my titanium handlebar in the mail the other day, but yesterday I found a great deal at Performance Bike on an Easton Monkey Lite XC carbon handlebar. I'm deciding between the two. The other will go up on craigslist.
I'm still waiting for the stem and fork.
Off to ride today, finally. They keep calling for sun and heat and it continues to rain. Hopefully today will be my lucky day.
Wednesday, May 12, 2010
Time to LIGHT it up!
Ok, so I've had the bike about a month now and I love it. It is clear to me that I'm going to go with the 29er full time. It's probably time that I sell the 26 inch ride even though I put some time customizing that bike. So, with the prospect of money coming in from that sale and with the fact that I'm going to commit to the 29er, I am planning a few upgrades for the bike:
1. Rock Shox Reba Race fork with poploc - This is an incredible fork. I have one for my other bike and I loved it. The remote poploc is a great feature as well and used a lot during climbing. It has a dual air spring chamber and all the adjustments you can ask for. I bought it in white yesterday. The best part, it only weights 3 .14 lbs.
2. I got a new stem. The adjustable stem that I was using is like a boat anchor. Also, it was less than reliable, allowing my handlebars to move while riding and loosening around the adjustment bolt. Very dangerous! I bought a profile stem set at 20 degrees. Much lighter too!
3. A new titanium handlebar is coming my way. Super light and super strong. This will be a huge improvement over the generic black heavy bar that I have there now. With the new stem and fork, my front end just got significantly lighter.
4. A new XT cassette. The Shimano HG something or other that I have back there works fine but I'd like to drop a little more weight off of the bike. That was one of the heaviest things on the bike that I could find.
I'll be putting the new parts on over the next week or two. I'll be sure to post pics. I'm looking to lighten this bike significantly.
Friday, April 30, 2010
Update
I first reported that my only disappointment with the bike was that it was difficult to unload the front end. I thought this might be an issue with 29ers generally. However, last week I slid the saddle back a hair and raised my stem to 20 degrees rather than 10, and now I can get the front end off the ground very easily. I suspect that if reduce the front end weight a bit, it will come off the ground even easier.
There you have it! I'm completely pleased with the bike now and I'm likely going to put my Gary Fisher up for sale this week. I just have no need for it any longer.
There you have it! I'm completely pleased with the bike now and I'm likely going to put my Gary Fisher up for sale this week. I just have no need for it any longer.
Wednesday, April 28, 2010
Window dressing

I've started working on a little project to add decals to my wheels on the new 29er. It all started when I saw a pair of Bontrager Race X Lite 29er wheels. I loved the look of the wheels but didn't want to put the money into a new wheelset. So, I came up with the idea of just buying the decals for the wheels. The only problem is that I couldn't find a replacement set anywhere.
So, I went to a guy I know who has made wheel decals for me in the past. He does a great job, but I simply didn't want to spend $60 for 8 wheel decals. That has brought me to my latest project. I'm going to make the decals myself. The brilliant part of it all is that I can make the decals for a fraction of the cost, I can make any kind of decals that I want, and I can make as many as I want.
As I began the project, it occurred to me, how am I going to make sure that the decals actually fit my wheels. The first thing that I did was I took a blank sheet of printer paper, held it up to my wheel and traced along the outline of the wheel. I then cut along that line. I then held up the piece of paper along the tire line and traced a line along the wheel just shy of the spoke nipples. I cut that line out. That gave me an initial template to work with.
I then traced along the edges of the template with a highlighter and scanned the template into my computer. If you don't highlight the edge of the template, the white paper will simply scan in on a white background and you won't be able to see the template at all.
With that done, I brought up the template file in my editing software. I use JASC Paint Shop Pro, but you can use other programs like Photoshop as well. I then scoured the internet for just the right font that I want to use and added that to my list of fonts on my computer. I then designed the decal, letter by letter, aligning them individually within the template.
That's where I am at this point. I have an initial decal made, but I have to design my other decals before I print.
I went to Office Depot yesterday and picked up a pack of self-lamintating sheets. I believe you get about 10 sheets for 8 bucks. I will be picking up clear sticker inkjet sheets from A.C. Moore today. I believe the package of 3 is about 8 bucks. You will want the self-laminating sheets to go over the sticker sheets because the ink may bleed from the stickers if they get wet. The laminate will add weatherproofing to the sticker so that they turn out to be similar to vinyl decals.
Once I get the sticker sheets and I design all of my decals, I will fit as many decals to one sticker sheet as possible, print, then laminate the sticker sheet, essentially weather proofing the decals. I will then apply the decals to my wheels.
I'll be sure to supply pictures of all of this when I complete the project. I'll be riding again today, as the weather is getting much better around here, so I may not have a chance to post the pics for a little while. Stay tuned!
Thursday, April 15, 2010
The Maiden Voyage
I got in a very nice ride today. I wanted to give the new toy a little test. We went up to Gambrill State Park, MD, a place full of rock gardens, super technical terrain, and advanced obstacles. Basically, I have no business riding the trails there.
In any event, I was taken back by how smooth the ride of the 29er is. It simply kept rumbling over loose rock, roots, and any other obstacles in its path. It seemed to soak up the terrain for me. I was surprised by the quality of the Rock Shox 318 Solo Air fork as well. A fter riding a Reba Race on my other bike, I thought I would find this shock to be inferior by far. It performed very well. I am impressed also that this fork came with a pop loc remote, a feature that I thought only came with $500 and above forks. I definitely used it on the climbs too.
I found the climbing ability of the frame to be every bit as good if not better than my Gary Fisher Tassajara. In fact, I found my front wheel never lifting involuntarily off the ground on steep climbs as my GF does, which was a great relief as I moved very precariously through a sea of sharp, loose rock.
In any event, I was taken back by how smooth the ride of the 29er is. It simply kept rumbling over loose rock, roots, and any other obstacles in its path. It seemed to soak up the terrain for me. I was surprised by the quality of the Rock Shox 318 Solo Air fork as well. A
 fter riding a Reba Race on my other bike, I thought I would find this shock to be inferior by far. It performed very well. I am impressed also that this fork came with a pop loc remote, a feature that I thought only came with $500 and above forks. I definitely used it on the climbs too.
I found the climbing ability of the frame to be every bit as good if not better than my Gary Fisher Tassajara. In fact, I found my front wheel never lifting involuntarily off the ground on steep climbs as my GF does, which was a great relief as I moved very precariously through a sea of sharp, loose rock.
Actually, my only reservation of the bike is that I found it very difficult to unload the front end when I wanted. I'm not sure if this is a 29er thing or if it is particular to the bike. It is likely caused by the much longer rear stays in the back and the lower bb drop. It could also have to do with added weight in front from the larger wheel. In any event, it is counterbalanced by the fact that you don't have to unload very often, you just simply roll over most obstacles with the giant wheels. Still, though, there are times when trying to clear tall obstacles that you would want that ability. Perhaps it will just take some getting used to.
I found the shifting on the bike to be crisp and I love the 1x9 ride. I encountered no chain slip whatsoever and my chain didn't drop once due to a nice, straight chain line and the N Gear Jumpstop. The 1x9 was simplistic but effective. At no time did I wish for more gears and I was riding a very steep trail both ways, up and down. The avid BB7's did very well and offered quick, responsive braking. Everything seemed pretty well dialed in. I may move my saddle back a hair, but that's about it. I love the bike and I'm very happy with my purchase.
I had my doubts about a Motobecane bike (I think they should re-brand as Moto by the way, just sounds way cooler and offers more street cred in my opinion) but so far so good. The only issue I've had through this whole process is the hole in the packaging upon arrival that didn't end up really create any issues.
Today is the Day
The new project and I (I really need a name for her) are going on our first cruise together this afternoon at Schaeffer Farms, MD. I love those trails!
I put the finishing touches on her this weekend. I went over the entire bike, tightening bolts, greasing and lubing, and dialing in all the moveable parts. She is ready!
I took her for a test spin around the neighborhood, but the pavement bored her. The real thing will be today. I'm looking forward to seeing how she'll ride.
Sunday, April 11, 2010
Ready to Ride
The build is officially done! I was able to stay up the past couple of nights to finish it off. Building it up basically from just a frame was rewarding and offered me the ability to customize almost every aspect of it.
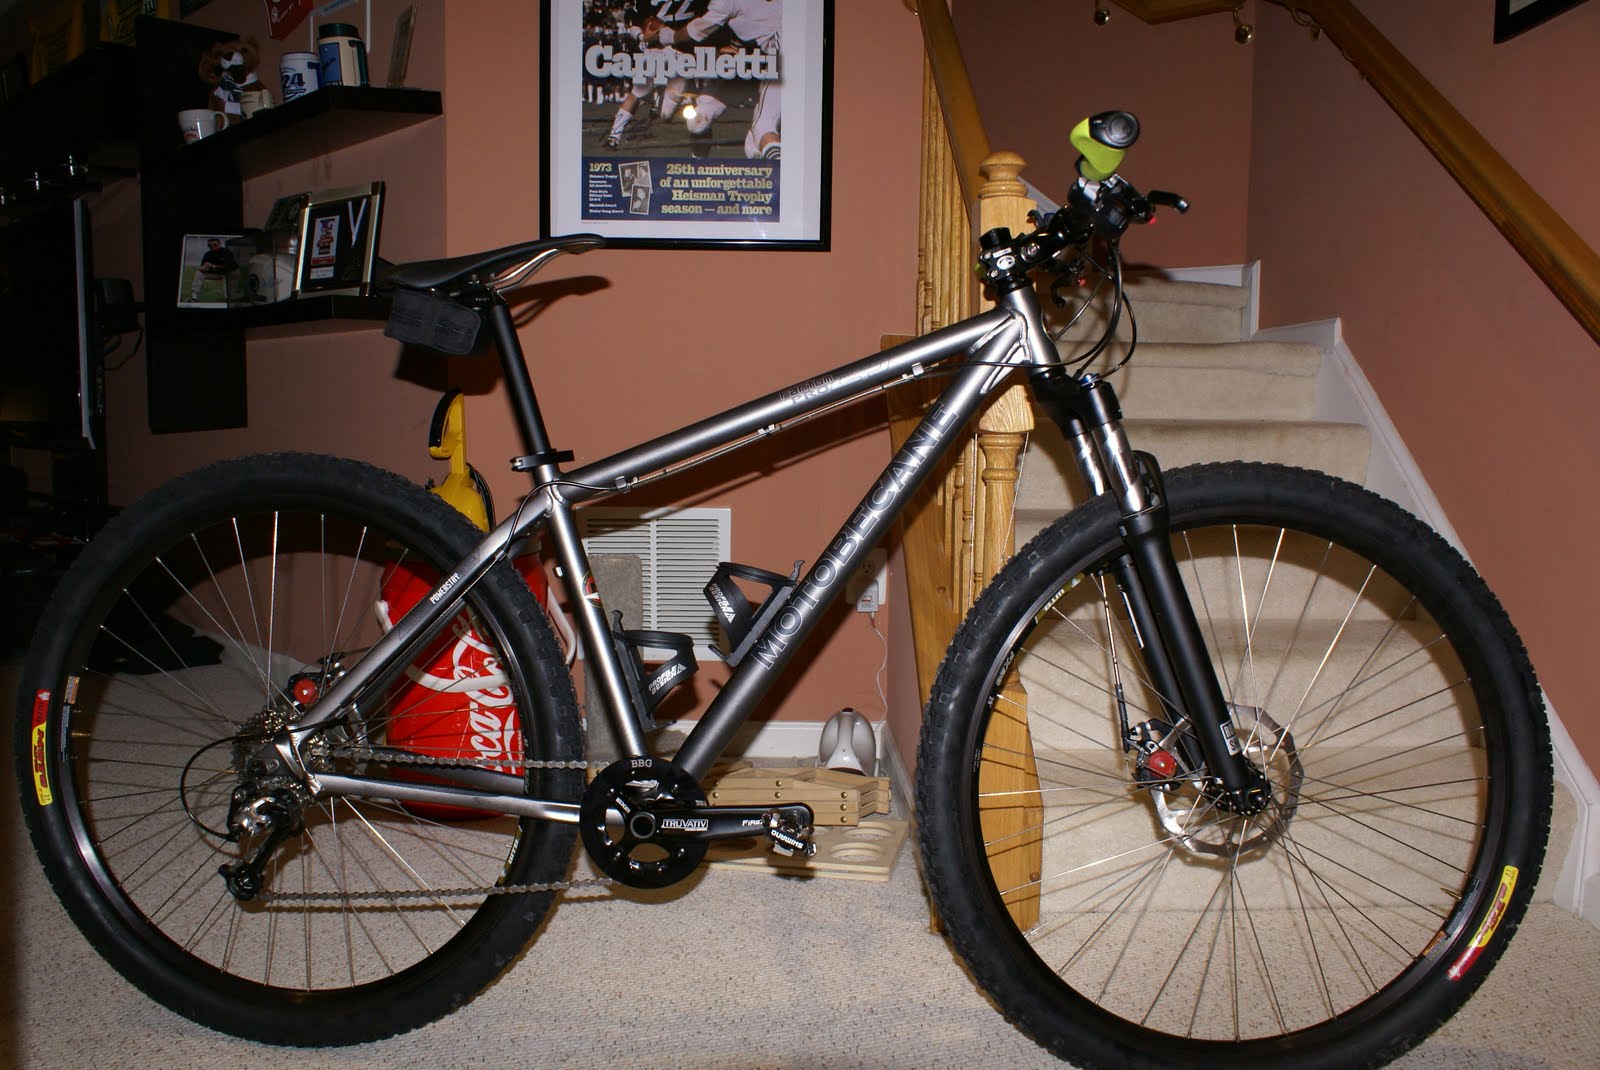
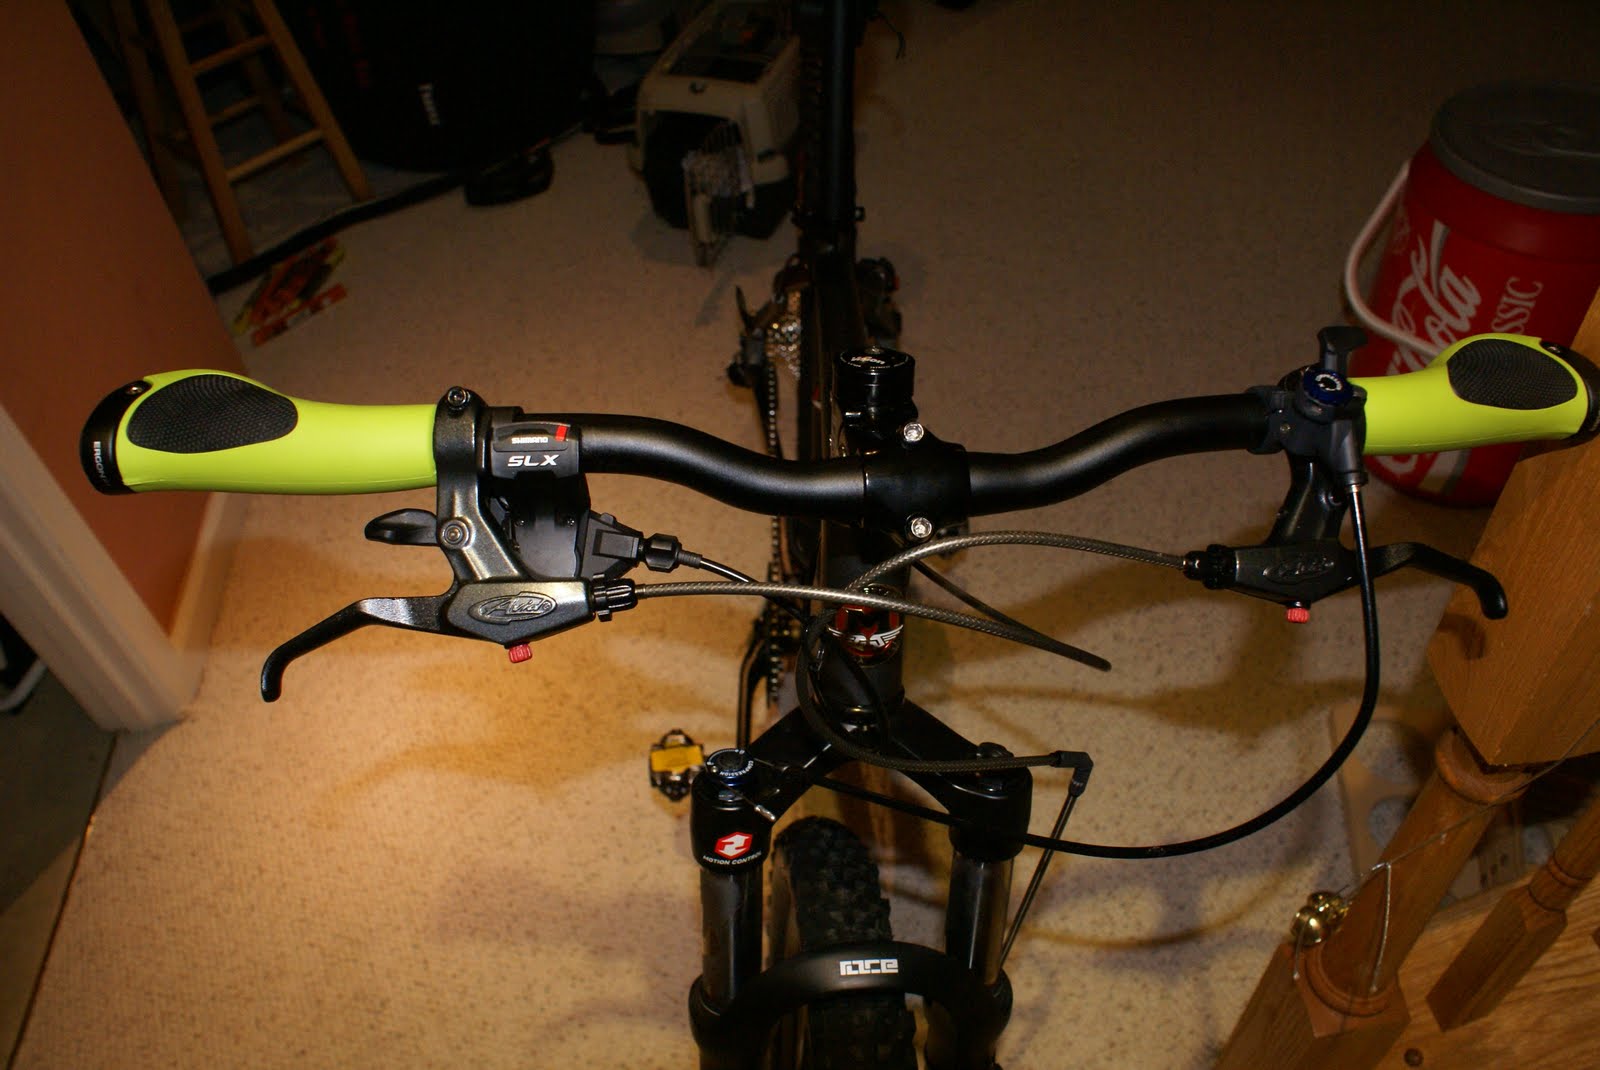
The 1x9 conversion is done. I took a close up of the BBG bash guard, chain, and n gear jump stop. I'll let you know if it all works well. I added Ergon GXP-1
  team green grips, to add a little spot of color to the otherwise black and gray bike.
 stop. I'll let you know if it all works well. I added Ergon GXP-1
  team green grips, to add a little spot of color to the otherwise black and gray bike.
I really like the look of the Sette Evo saddle too. I don't know how it'll ride, but it looks great in my opinion. I added Shiman m520 pedals, bb7 mechanical brakes, speed dial levers, and an adjustable stem rather than the god-awful anchor that Moto provides for you.

I'll be taking it on its maiden voyage sometime this week. I have noticed that the disc brakes are a little mushy, but I think that is to be expected for brand new brakes. I also have to make sure the wheels are in true as there is some spotty rub on disc brakes as they roll through the adapters.

Enjoy the pics! I'll be sure to let you know how she rides later this week.

Friday, April 9, 2010
New Parts Arrived
So I got some of the new parts, including the brake cable, in the mail yesterday, so everything is here. I got just a short bit of time last night to work on the bike, but I didn't get much done. I was able to get the chain on, install the n gear jump stop, dial in the rear derailleur to a point (not perfect yet). I'm hoping that tonight after the wife and kid go to bed that I can finish off the project. All that remains is installing the brakes, dialing in the shifting, pumping up tires, pumping up the air fork, installing the new grips, and an oiling and greasing here and there. That shouldn't take too long. I'm hoping to get a chance to ride next week.
I will supply pictures of the ongoing build this weekend.
I will supply pictures of the ongoing build this weekend.
Sunday, April 4, 2010
The 1x9 conversion begins
I think because it is Easter weekend that my n gear jump stop wasn't delivered on time, but I didn't let that stop me from starting the 1x9 conversion. The conversion, so far has been pretty simple, though I'm not yet done.
After frustrating myself with not being able to figure out how to remove the crank, I went to the first place I should've looked for advice, the Park tool site. That site has everything. Anyway, here are the directions from Park Tool as to how to remove the Truvativ Fire X GXP crank http://parktool.com/repair/readhowto.asp?id=122#sram. I tirelessly fought to twist clockwise, when all I had to do was go counter-clockwise and the left arm would've come right off.
After reading PT closely, I twisted counter-clockwise with an 8mm hex and that stubborn hex bolt started to turn. I got the left arm off pretty quickly. After that, I tugged at the drive side crank arm but it was not sliding out. I took an old rubber brake pad and a hammer and gently tapped the spindle on the left side to get the crank to budge. I'm not sure that that move was PT approved.
 bolt started to turn. I got the left arm off pretty quickly. After that, I tugged at the drive side crank arm but it was not sliding out. I took an old rubber brake pad and a hammer and gently tapped the spindle on the left side to get the crank to budge. I'm not sure that that move was PT approved.
 The drive side crank came right off after that. I then simply removed the inner-small ring  "granny gear" from the crank. I re-installed the bolts to prevent dirt and grime from getting into the bolt holes and so I wouldn't lose them if I ever wanted to go back to a 3x9. I already removed the large chain ring and replaced it with a BBG light weight bash guard.
 "granny gear" from the crank. I re-installed the bolts to prevent dirt and grime from getting into the bolt holes and so I wouldn't lose them if I ever wanted to go back to a 3x9. I already removed the large chain ring and replaced it with a BBG light weight bash guard.
Before putting the crank back on, I greased the spindle very well. The crank was not really  spinning as freely as I liked when it came from the factory. It spins a little easier now. I slid the crank back in, tapped it again lightly with a hammer and old brake pad to ensure it was all the way through the bottom bracket and then reattached the left crank arm. I used a torque wrench to tighten it to 360 inch pounds or 30 foot pounds. That was about as much as I could put into it to. At that point the crank installation was done.
 spinning as freely as I liked when it came from the factory. It spins a little easier now. I slid the crank back in, tapped it again lightly with a hammer and old brake pad to ensure it was all the way through the bottom bracket and then reattached the left crank arm. I used a torque wrench to tighten it to 360 inch pounds or 30 foot pounds. That was about as much as I could put into it to. At that point the crank installation was done.
Now all I have to do is install the N gear jump top, adjust the chain, and dial in the rear derailleur. I have to get the jump stop first though.
Friday, April 2, 2010
The Big Build
Well, the big build started with a big flurry but ended suddenly when I realized that I never ordered brake cable and housing for the brakes. Without the brake cable, I couldn't finalize the disc brakes, the rear derailleur, or the cockpit setup. I'm also waiting on the n gear jump stop to arrive, so I couldn't dive in to the 1x9 conversion either.


I did get a lot of stuff started though. I installed the seatpost with my new saddle. I got the cockpit started, loosely aligning the brake levers, shifters, grips and remote lockout control for the fork. I set the stem in place temporarily. I removed the rookie cookie from the rear wheel, installed the brake rotors and loosely set the brake adapters. I also removed the large chainring and installed the BBG bash guard.


The bike is almost looking like a real bike now. I had to put in another order tonight for the brake cable and housing, grips (a special surprise finishing touch), two water bottle cages, and tubes. Ah, the things you don't even think about when building a bike until you go to ride.
Here are some pics of how the build is going. The new supplies should be here in a couple of days. My hope is to have the build done in a week. We'll see about that.
Subscribe to:
Posts (Atom)