

I first reported that my only disappointment with the bike was that it was difficult to unload the front end. I thought this might be an issue with 29ers generally. However, last week I slid the saddle back a hair and raised my stem to 20 degrees rather than 10, and now I can get the front end off the ground very easily. I suspect that if reduce the front end weight a bit, it will come off the ground even easier.
There you have it! I'm completely pleased with the bike now and I'm likely going to put my Gary Fisher up for sale this week. I just have no need for it any longer.
Friday, April 30, 2010
Wednesday, April 28, 2010
Window dressing

I've started working on a little project to add decals to my wheels on the new 29er. It all started when I saw a pair of Bontrager Race X Lite 29er wheels. I loved the look of the wheels but didn't want to put the money into a new wheelset. So, I came up with the idea of just buying the decals for the wheels. The only problem is that I couldn't find a replacement set anywhere.
So, I went to a guy I know who has made wheel decals for me in the past. He does a great job, but I simply didn't want to spend $60 for 8 wheel decals. That has brought me to my latest project. I'm going to make the decals myself. The brilliant part of it all is that I can make the decals for a fraction of the cost, I can make any kind of decals that I want, and I can make as many as I want.
As I began the project, it occurred to me, how am I going to make sure that the decals actually fit my wheels. The first thing that I did was I took a blank sheet of printer paper, held it up to my wheel and traced along the outline of the wheel. I then cut along that line. I then held up the piece of paper along the tire line and traced a line along the wheel just shy of the spoke nipples. I cut that line out. That gave me an initial template to work with.
I then traced along the edges of the template with a highlighter and scanned the template into my computer. If you don't highlight the edge of the template, the white paper will simply scan in on a white background and you won't be able to see the template at all.
With that done, I brought up the template file in my editing software. I use JASC Paint Shop Pro, but you can use other programs like Photoshop as well. I then scoured the internet for just the right font that I want to use and added that to my list of fonts on my computer. I then designed the decal, letter by letter, aligning them individually within the template.
That's where I am at this point. I have an initial decal made, but I have to design my other decals before I print.
I went to Office Depot yesterday and picked up a pack of self-lamintating sheets. I believe you get about 10 sheets for 8 bucks. I will be picking up clear sticker inkjet sheets from A.C. Moore today. I believe the package of 3 is about 8 bucks. You will want the self-laminating sheets to go over the sticker sheets because the ink may bleed from the stickers if they get wet. The laminate will add weatherproofing to the sticker so that they turn out to be similar to vinyl decals.
Once I get the sticker sheets and I design all of my decals, I will fit as many decals to one sticker sheet as possible, print, then laminate the sticker sheet, essentially weather proofing the decals. I will then apply the decals to my wheels.
I'll be sure to supply pictures of all of this when I complete the project. I'll be riding again today, as the weather is getting much better around here, so I may not have a chance to post the pics for a little while. Stay tuned!
Thursday, April 15, 2010
The Maiden Voyage
I got in a very nice ride today. I wanted to give the new toy a little test. We went up to Gambrill State Park, MD, a place full of rock gardens, super technical terrain, and advanced obstacles. Basically, I have no business riding the trails there.
In any event, I was taken back by how smooth the ride of the 29er is. It simply kept rumbling over loose rock, roots, and any other obstacles in its path. It seemed to soak up the terrain for me. I was surprised by the quality of the Rock Shox 318 Solo Air fork as well. A fter riding a Reba Race on my other bike, I thought I would find this shock to be inferior by far. It performed very well. I am impressed also that this fork came with a pop loc remote, a feature that I thought only came with $500 and above forks. I definitely used it on the climbs too.
I found the climbing ability of the frame to be every bit as good if not better than my Gary Fisher Tassajara. In fact, I found my front wheel never lifting involuntarily off the ground on steep climbs as my GF does, which was a great relief as I moved very precariously through a sea of sharp, loose rock.
In any event, I was taken back by how smooth the ride of the 29er is. It simply kept rumbling over loose rock, roots, and any other obstacles in its path. It seemed to soak up the terrain for me. I was surprised by the quality of the Rock Shox 318 Solo Air fork as well. A
 fter riding a Reba Race on my other bike, I thought I would find this shock to be inferior by far. It performed very well. I am impressed also that this fork came with a pop loc remote, a feature that I thought only came with $500 and above forks. I definitely used it on the climbs too.
I found the climbing ability of the frame to be every bit as good if not better than my Gary Fisher Tassajara. In fact, I found my front wheel never lifting involuntarily off the ground on steep climbs as my GF does, which was a great relief as I moved very precariously through a sea of sharp, loose rock.
Actually, my only reservation of the bike is that I found it very difficult to unload the front end when I wanted. I'm not sure if this is a 29er thing or if it is particular to the bike. It is likely caused by the much longer rear stays in the back and the lower bb drop. It could also have to do with added weight in front from the larger wheel. In any event, it is counterbalanced by the fact that you don't have to unload very often, you just simply roll over most obstacles with the giant wheels. Still, though, there are times when trying to clear tall obstacles that you would want that ability. Perhaps it will just take some getting used to.
I found the shifting on the bike to be crisp and I love the 1x9 ride. I encountered no chain slip whatsoever and my chain didn't drop once due to a nice, straight chain line and the N Gear Jumpstop. The 1x9 was simplistic but effective. At no time did I wish for more gears and I was riding a very steep trail both ways, up and down. The avid BB7's did very well and offered quick, responsive braking. Everything seemed pretty well dialed in. I may move my saddle back a hair, but that's about it. I love the bike and I'm very happy with my purchase.
I had my doubts about a Motobecane bike (I think they should re-brand as Moto by the way, just sounds way cooler and offers more street cred in my opinion) but so far so good. The only issue I've had through this whole process is the hole in the packaging upon arrival that didn't end up really create any issues.
Today is the Day
The new project and I (I really need a name for her) are going on our first cruise together this afternoon at Schaeffer Farms, MD. I love those trails!
I put the finishing touches on her this weekend. I went over the entire bike, tightening bolts, greasing and lubing, and dialing in all the moveable parts. She is ready!
I took her for a test spin around the neighborhood, but the pavement bored her. The real thing will be today. I'm looking forward to seeing how she'll ride.
Sunday, April 11, 2010
Ready to Ride
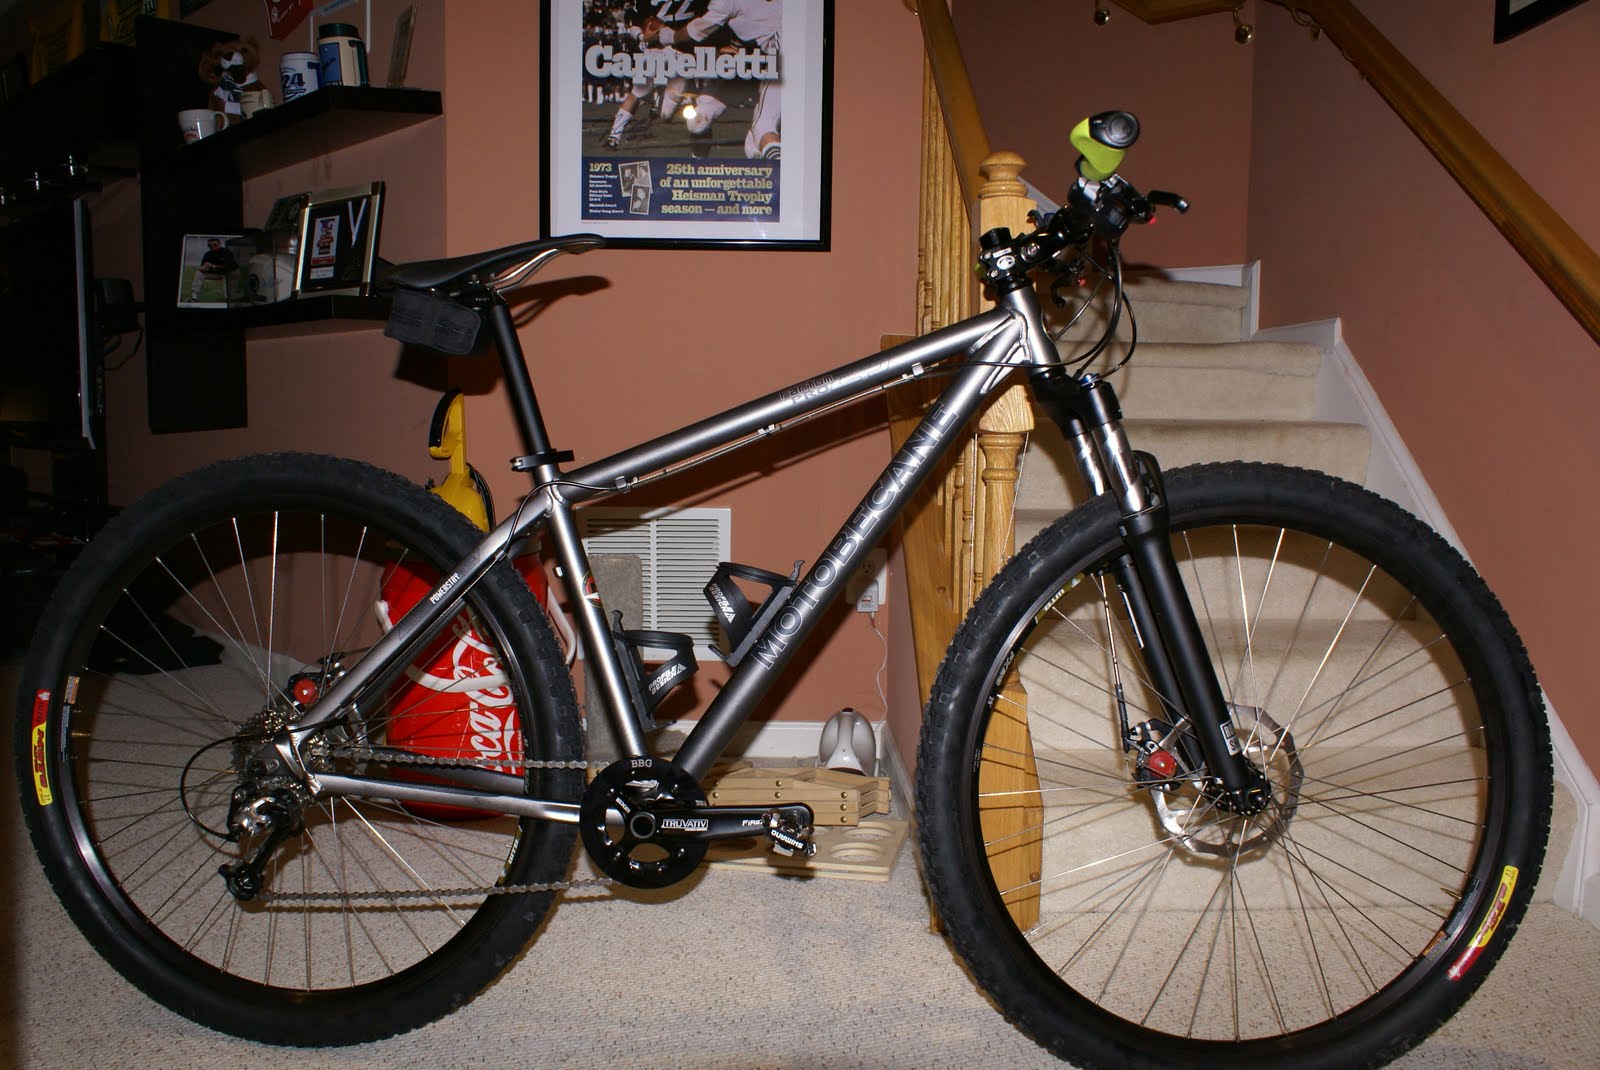
The build is officially done! I was able to stay up the past couple of nights to finish it off. Building it up basically from just a frame was rewarding and offered me the ability to customize almost every aspect of it.
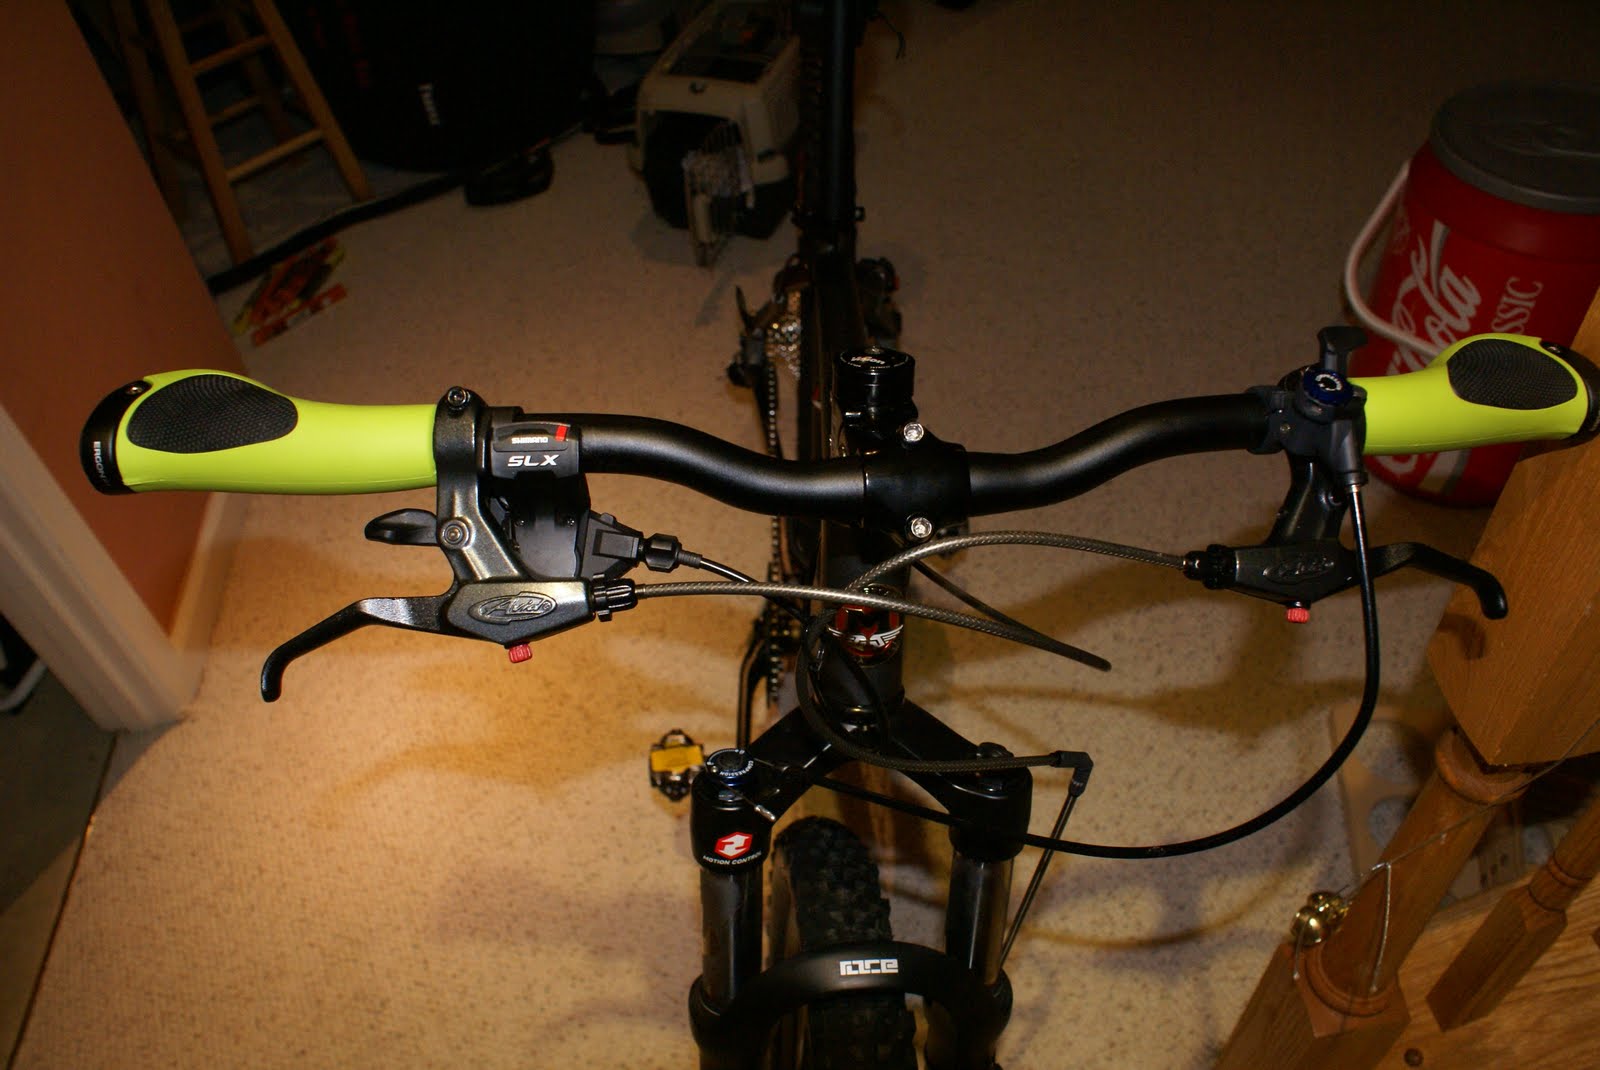
The 1x9 conversion is done. I took a close up of the BBG bash guard, chain, and n gear jump stop. I'll let you know if it all works well. I added Ergon GXP-1
  team green grips, to add a little spot of color to the otherwise black and gray bike.
 stop. I'll let you know if it all works well. I added Ergon GXP-1
  team green grips, to add a little spot of color to the otherwise black and gray bike.
I really like the look of the Sette Evo saddle too. I don't know how it'll ride, but it looks great in my opinion. I added Shiman m520 pedals, bb7 mechanical brakes, speed dial levers, and an adjustable stem rather than the god-awful anchor that Moto provides for you.

I'll be taking it on its maiden voyage sometime this week. I have noticed that the disc brakes are a little mushy, but I think that is to be expected for brand new brakes. I also have to make sure the wheels are in true as there is some spotty rub on disc brakes as they roll through the adapters.

Enjoy the pics! I'll be sure to let you know how she rides later this week.

Friday, April 9, 2010
New Parts Arrived
So I got some of the new parts, including the brake cable, in the mail yesterday, so everything is here. I got just a short bit of time last night to work on the bike, but I didn't get much done. I was able to get the chain on, install the n gear jump stop, dial in the rear derailleur to a point (not perfect yet). I'm hoping that tonight after the wife and kid go to bed that I can finish off the project. All that remains is installing the brakes, dialing in the shifting, pumping up tires, pumping up the air fork, installing the new grips, and an oiling and greasing here and there. That shouldn't take too long. I'm hoping to get a chance to ride next week.
I will supply pictures of the ongoing build this weekend.
I will supply pictures of the ongoing build this weekend.
Sunday, April 4, 2010
The 1x9 conversion begins
I think because it is Easter weekend that my n gear jump stop wasn't delivered on time, but I didn't let that stop me from starting the 1x9 conversion. The conversion, so far has been pretty simple, though I'm not yet done.
After frustrating myself with not being able to figure out how to remove the crank, I went to the first place I should've looked for advice, the Park tool site. That site has everything. Anyway, here are the directions from Park Tool as to how to remove the Truvativ Fire X GXP crank http://parktool.com/repair/readhowto.asp?id=122#sram. I tirelessly fought to twist clockwise, when all I had to do was go counter-clockwise and the left arm would've come right off.
After reading PT closely, I twisted counter-clockwise with an 8mm hex and that stubborn hex bolt started to turn. I got the left arm off pretty quickly. After that, I tugged at the drive side crank arm but it was not sliding out. I took an old rubber brake pad and a hammer and gently tapped the spindle on the left side to get the crank to budge. I'm not sure that that move was PT approved.
 bolt started to turn. I got the left arm off pretty quickly. After that, I tugged at the drive side crank arm but it was not sliding out. I took an old rubber brake pad and a hammer and gently tapped the spindle on the left side to get the crank to budge. I'm not sure that that move was PT approved.
 The drive side crank came right off after that. I then simply removed the inner-small ring  "granny gear" from the crank. I re-installed the bolts to prevent dirt and grime from getting into the bolt holes and so I wouldn't lose them if I ever wanted to go back to a 3x9. I already removed the large chain ring and replaced it with a BBG light weight bash guard.
 "granny gear" from the crank. I re-installed the bolts to prevent dirt and grime from getting into the bolt holes and so I wouldn't lose them if I ever wanted to go back to a 3x9. I already removed the large chain ring and replaced it with a BBG light weight bash guard.
Before putting the crank back on, I greased the spindle very well. The crank was not really  spinning as freely as I liked when it came from the factory. It spins a little easier now. I slid the crank back in, tapped it again lightly with a hammer and old brake pad to ensure it was all the way through the bottom bracket and then reattached the left crank arm. I used a torque wrench to tighten it to 360 inch pounds or 30 foot pounds. That was about as much as I could put into it to. At that point the crank installation was done.
 spinning as freely as I liked when it came from the factory. It spins a little easier now. I slid the crank back in, tapped it again lightly with a hammer and old brake pad to ensure it was all the way through the bottom bracket and then reattached the left crank arm. I used a torque wrench to tighten it to 360 inch pounds or 30 foot pounds. That was about as much as I could put into it to. At that point the crank installation was done.
Now all I have to do is install the N gear jump top, adjust the chain, and dial in the rear derailleur. I have to get the jump stop first though.
Friday, April 2, 2010
The Big Build
Well, the big build started with a big flurry but ended suddenly when I realized that I never ordered brake cable and housing for the brakes. Without the brake cable, I couldn't finalize the disc brakes, the rear derailleur, or the cockpit setup. I'm also waiting on the n gear jump stop to arrive, so I couldn't dive in to the 1x9 conversion either.


I did get a lot of stuff started though. I installed the seatpost with my new saddle. I got the cockpit started, loosely aligning the brake levers, shifters, grips and remote lockout control for the fork. I set the stem in place temporarily. I removed the rookie cookie from the rear wheel, installed the brake rotors and loosely set the brake adapters. I also removed the large chainring and installed the BBG bash guard.


The bike is almost looking like a real bike now. I had to put in another order tonight for the brake cable and housing, grips (a special surprise finishing touch), two water bottle cages, and tubes. Ah, the things you don't even think about when building a bike until you go to ride.
Here are some pics of how the build is going. The new supplies should be here in a couple of days. My hope is to have the build done in a week. We'll see about that.
Thursday, April 1, 2010
It has arrived!
I got home today to a large bike box sitting on my front porch. Of course I rushed outside as soon as I got in the house and pulled it in. There it was, the Motobecane box. Here are my initial impressions:
1. Packaging: As I've heard from some other people, the packaging was partly torn. To be fair though, it was only the handle area on t he box and nothing inside was damaged. It was by the wheel and there were no marks on the rim or anything. Likely the UPS guy did it when handling the box so I won't hold that against Bikesdirect.
The amount of packaging and protection on the inside was formidable. I have pictures of all of the padding and tight packaging of all of the parts. The small parts were packaged together in a box, the saddle, seatpost, and handlebar were packaged separately and all protected by cardboard. All in all I'm impressed.


1. Packaging: As I've heard from some other people, the packaging was partly torn. To be fair though, it was only the handle area on t
 he box and nothing inside was damaged. It was by the wheel and there were no marks on the rim or anything. Likely the UPS guy did it when handling the box so I won't hold that against Bikesdirect.
The amount of packaging and protection on the inside was formidable. I have pictures of all of the padding and tight packaging of all of the parts. The small parts were packaged together in a box, the saddle, seatpost, and handlebar were packaged separately and all protected by cardboard. All in all I'm impressed.


2. The condition of the bike: The bike was brand new as expected. The only issue I had was that the front derailleur cable was pretty frayed. That's something I would've done when I first  started working on my bikes. They certainly should not have left it on the bike. It should have been replaced. Fortunately, it doesn't matter much as I'm coing to convert the bike to a 1x9 so I didn't need the cable anyway. The frame is a beautiful color (matte gray) with subtle blue lettering. It is very understated, not flashy like many of the "generic" brand bikes. I really like that. The flat rear stays are a really nice touch. Everything was in great condition on the bike, no scratches chips dents or dings or otherwise, as to be expected.

 started working on my bikes. They certainly should not have left it on the bike. It should have been replaced. Fortunately, it doesn't matter much as I'm coing to convert the bike to a 1x9 so I didn't need the cable anyway. The frame is a beautiful color (matte gray) with subtle blue lettering. It is very understated, not flashy like many of the "generic" brand bikes. I really like that. The flat rear stays are a really nice touch. Everything was in great condition on the bike, no scratches chips dents or dings or otherwise, as to be expected.


3. Bike Build Progress: I didn't want to totally dive in tonight, but I did start stripping all of the parts off the frame that I didn't want. Pretty much all that was left on the bike when I was done was the rear derailleur and shifting cable for the rear derailleur. I removed the front der, chain, saddle, brakes, brake cables and housing. I removed the reflectors from the wheels and all of the little packaging parts.
The bike is ready for the build to start tomorrow night. Some of the new parts came in today and the rest should be here by tomorrow night. I ordered m520 pedals to replace the platforms that came with the bike and a BBG light weight bashguard to replace the large chainring as part of the 1x9 conversion. Those parts are already here. Tomorrow I should get the brakes and the saddle. So far I'm very pleased with the product.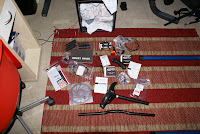


The bike is ready for the build to start tomorrow night. Some of the new parts came in today and the rest should be here by tomorrow night. I ordered m520 pedals to replace the platforms that came with the bike and a BBG light weight bashguard to replace the large chainring as part of the 1x9 conversion. Those parts are already here. Tomorrow I should get the brakes and the saddle. So far I'm very pleased with the product.


I'll be posting more pictures later of the bike's arrival.
It's the Big Day!
UPS says the bike went on the truck for delivery at 4:30 am today. I'm counting the minutes!
Subscribe to:
Posts (Atom)