

Keep in mind, I've messed around with a lot of bike parts, but the fork inners is something I never wanted to take on. It is my final frontier so to speak. I was a total novice getting into this and it took me about twenty minutes to complete with very little oil leakage or mess. Here are a few easy steps with pictures to complete your own conversion. I will try to be as clear as possible to ease your pain:

1. Back off the bottom black 10mm hex nut located on the air chamber side of the fork. It's easiest to use a hex socket for this, but mine wouldn't fit so I used a crescent wrench. It removed very easily. Just back it off a few threads. Do not remove it entirely at this time.

2. Unscrew the top blue cap that covers the air valve. Remove it and set it aside.

3. Using your air pump or some other tool remove all of the air out of the chamber. You may see a tiny bit of oily discharge in the air valve. That's normal.
4. After removing all of the air, use a 26 mm socket to remove the silver cap covering the air  chamber on the top of the fork, air side (of course). Totally remove it and set it aside. If you look down the air chamber, you will see the resevoir of thick, blue/green fox float oil.
 chamber on the top of the fork, air side (of course). Totally remove it and set it aside. If you look down the air chamber, you will see the resevoir of thick, blue/green fox float oil.
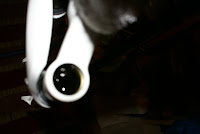
5. Grab a clean cup or other container (assuming the oil is clean and reuseable, otherwise you just want any container). Position the container over the air chamber and flip both upside down. The float oil will run into your cup. Make sure you save every little bit that you can so that you can replace as much as possible.

6. Now that your air chamber is clear, clamp your fork into a bike stand and make sure it is  almost horizontal. You will not want to make it completly horizontal, but let the lower legs reside just ever so slightly below the top of the fork. I went completely horizontal and ended up getting a slight leak of the oil from the lowers into the air chamber. Keeping it nearly horizontal will prohibit the lower oil (yellow oil) from leaking out during the next step.
 almost horizontal. You will not want to make it completly horizontal, but let the lower legs reside just ever so slightly below the top of the fork. I went completely horizontal and ended up getting a slight leak of the oil from the lowers into the air chamber. Keeping it nearly horizontal will prohibit the lower oil (yellow oil) from leaking out during the next step.
7. After the fork is clamped in, you will want to tap on the black hex nut on the bottom of the  fork to push the compression rod (where the spacer resides) out. Fox recommends using a plastic head hammer for this so you don't damage the fork. I began using a rubber mallet, but got nowhere. I then switched to a regular hammer and tapped very gently. You will also want to have a clean cup handy just in case oil does come rushing out. As you see in the pic, I set up a contraption with a cup and electrical tape so I wouldn't need 10 hands to complete the operation.
 fork to push the compression rod (where the spacer resides) out. Fox recommends using a plastic head hammer for this so you don't damage the fork. I began using a rubber mallet, but got nowhere. I then switched to a regular hammer and tapped very gently. You will also want to have a clean cup handy just in case oil does come rushing out. As you see in the pic, I set up a contraption with a cup and electrical tape so I wouldn't need 10 hands to complete the operation.
8. Once you see the bottom threaded piece of the rod push the through the hole in the bottom (if you've done step 6 correctly, no oil will come out), you will want to take a hex wrench or some other tool and push it through the hole to push the compression rod out the rest of the way.
9. Once the compression rod pops up through the air chamber, locate the spacer on top of the springs (it's that black, knob looking thing on top of the spring), and remove it by gently pushing it off of the rod. Once removed, the springs may stick in their original position for a moment. Just take a hand and help them extend fully to the top of the rod where the space was residing. You've just made your fork a 100mm travel fork. Congratulations!

10. Use your thumb or finger to push the rod back through the hole at the bottom. Assuming no oil was lost (it wasn't here) simply tighten your 10mm hex nut back on the threaded rod.
11. Tilt your fork back to vertical in the bike stand, and replace as much float oil as you can back into the air chamber.

12. Use your 26mm hex to tighten the air chamber cap.
13. Fill the air chamber with the required amount of air and replace the air valve cap.
Voila!!! Mission complete.
You may also take this time to perform full maintenance or replace your oil since you have the fork apart anyway. I'm flirting with the idea of doing that since I did lose a tiny bit of oil. My plan is not to buy the Fox Float oil, but rather 85 wt gear oil, which is what it really is just a lot cheaper and 10 wt shock oil from the cheapest manufacturer. I'm also going to buy a syringe so I can accurately and neatly replace the oil.
Now that I have the fork set at 100mm, I am in the process of cutting the steerer, positioning the star nut and running the brake cable through the fork. I also want to get some kind of protectant for the fox decals as they look like they lift easily. I also need to dial the fork in per Fox instructions.
I hope the tutorial helped. Please leave feedback and let me know what you think. The steps were based on an article I found on mtbr, but I couldn't find any pictures detailing the best way to perform the surgery. I hope I've provided that here.
Awesome instructions. Just converted 2 forks to 100mm. Thanks!
ReplyDeleteCharly, MD
Great procedure with pics, I just completed the conversion no issues.
ReplyDeleteHaving gained the extra 7/8" or so I lowered the bars the same amount by moving spacers around.
Curious to see the effect of a different head tube angle though.
Bike is a Superfly Hardtail..
thanks again!
Dave
btw did you add oil to allow for the increased travel ? Not sure if this is necessary...
ReplyDeleteDave
What real world changes have you noticed? I am looking into switching my G2 80mm F29 to 100mm.
ReplyDelete